The production and manufacturing process of vibratory finishing machines
Let’s take a look at how a Vibratory Finishing Machine changes from a steel plate into a polishing artifacts for deburring and descaling.
Vibratory finishing machine production process
-
1. BlankingThe purchased steel plates of standard sizes are cut into small iron plates according to the sizes of different machine models. The factors that affect the quality of machine products in this link are the quality and thickness of the steel plate. Our steel plates are all from the large factory of Shanghai Baosteel, with uniform thickness, and are all 4mm thick plates.
-
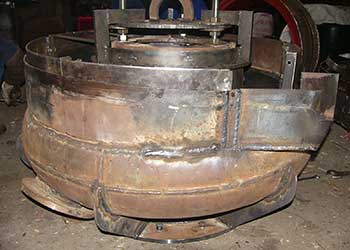
2. FormingThe cut steel plate is rolled into a cylinder with a plate rolling machine, which is used as the base of the machine and the barrel-shaped cylinder in the middle of the working chamber for installing the motor. Another main component is the bowl-shaped working chamber of the machine, which is pressed out using a hydraulic press and a special mold. In this way, the main components of the machine frame are finished.
-
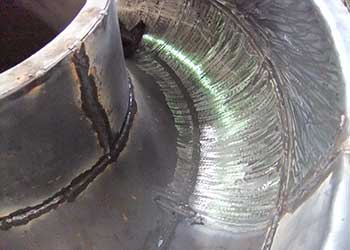
3. WeldingThis process is to weld the two ends of the rolled cylinder just now, and at the same time weld the bottom heel under the base to assemble the support of the vibration spring. This process can also affect the quality of the machine. Because the welds are not up to standard, problems such as cracking and falling off may occur during future use.
-
4. Inspection and FinishingCheck the surface condition of the weld, remove welding slag and oxide scale, use a grinder to grind the weld, and polish flash and burrs. Everyone knows that details are the devil, especially in the production process of industrial products, some seemingly inconspicuous small details often determine the final quality of the product. Blisters, small cracks in welds, flash and burrs on the surface of accessories will ultimately determine the appearance quality and service life of the machine.
-
5. PU CastingLining the inner wall of the hydraulically formed working tank with wear-resistant polyurethane colloid is the task of this process. During casting, a mold with a diameter smaller than the external frame body should be placed in the chamber, the external frame body and the mold should be fixed, and then the hot-melted PU glue should be poured into the gap between the frame and the mold. After the colloid cools and solidifies, it can be removed. After molding, the working chamber lined with PU glue is ready. This link is a key process that affects the service life of the machine. The wear resistance, thickness, and hardness of PU glue are factors that affect the length of use. Our polyester raw materials are all products from Dow Chemical (DOW) in the United States, and the casting thickness can reach about 15-20cm.
-
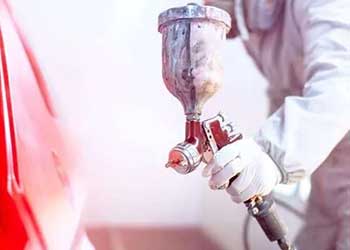
6. PaintingThe next step is to spray paint on the surface of the working chamber and base, which can protect the iron plate and improve the aesthetics of the machine. Apply putty on the surface of the iron plate first to repair some obvious defects, such as pits, gaps, etc. After the putty dries, you can spray various beautiful colors.
-
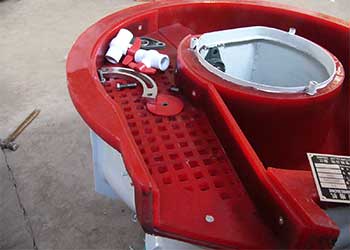
7. AssemblingAll required parts are ready. The next step is to put them together. First, a vibration motor needs to be installed in the middle cylindrical barrel of the machine. Install the motor to the base using a flange. The upper and lower ends of the motor are equipped with eccentric swing arm, commonly known as hammers. This is the main component for adjusting the direction and speed of the machine’s movement. Another major installation task is the installation of the base spring. Put the springs one by one on the support tubes on the base, so that the working chamber is suspended and supported on the base. The eccentric excitation force of the vibration motor will be brought to the chamber body to produce a spiral tumbling motion.
-
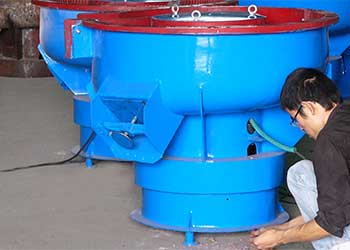
8. Self TestingAfter all the installation steps are completed, it is the last step of power-on self-test. Connect the machine’s power cord to the control box and press the start button to start the machine. In this step, you need to check whether the direction of rotation and rolling of the machine is correct, whether the vibration frequency and amplitude are normal, whether there is any abnormal noise, and whether the installation and tightening bolts are loose. If everything is OK, it can be packaged and shipped.
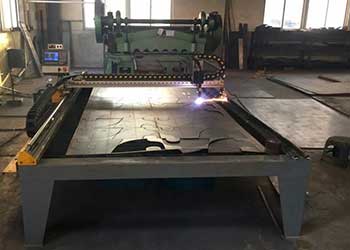
1. Blanking
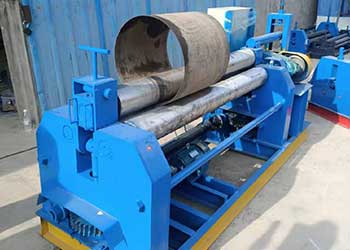
2. Forming
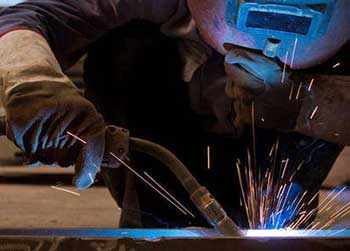
3. Welding
4. Detecting&Finishing
5. PU Casting
6. Painting
7. Assembling